Showing posts with label nyx. Show all posts

Friday, September 10, 2010

Brown and black eyeshadows - two looks!

Sorry for the lack of posts... but we were hit with an earthquake on the 4th of September. Many BAAAWs.

Anyway, today I will be showing you guys how to wear browns and monochrome colours - on each eye. So I will be wearing two looks - AT THE SAME TIME!

These are my Nyx eyeshadow trios; the one on the left is browns and the one on the right is the monochromatic colours.

Firstly...
...you will need concealer and foundation. I am using Maybelline's Mineral Power products.

And then, with an eyeshadow brush,
pat on the middle colour (or any medium colours) onto your lid. As you can see, my right eye has grey and my left eye has taupe, which almost blends into my skin. :P


With a clean brush...
...apply the lightest colour onto your brow bone. You can use any bright shimmer for this purpose.

Then with a crease brush (not shown) blend the darkest colours into the crease...


and blend slightly upwards towards the brow bone. Also, pat some of the dark colour on the lower lash line.

Then you'll need matching eye pencils - I'm using a brown for the brown eye, and a black for the monochrome eye. As you can see, my black pencil is well loved. :D

Here is what they should look like so far.

Apply black mascara for the monochrome eye, or brown mascara for the brown eye. It doesn't really matter, really, because it's not exactly discernible whether if your mascara is brown or black, but I thought I'd keep it consistent.

Here is the monochromatic eyeshadow look...

...and the brown eyeshadow look.

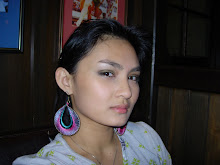
Stick on your blush and contour, and a soft pink lipstick, and you're ready to go.

Yeah, not the greatest post, but I've been a bit rattled lately. Many aftershocks.

Products used:
Nyx black/grey/white and brown/taupe/nude trio
Maybelline Mineral Power powder foundation in Pure Beige
Maybelline Mineral Power concealer in Pure Beige 2-4
The Body Shop black kohl pencil
Chi Chi eye pencil in Wicked
Maybelline Colossal mascara in Glam Black and Glam Brown
miscellaneous blush and taupe eyeshadow as contour

Tuesday, August 10, 2010

Sorry for the lack of posts!

Sorry for the lack of posts! I've been swamped with reading material from uni.

Instead, I will write a short post about why you shouldn't stick on too much make up.

I've seen many people with over bronzed face and over caked foundations. I know how it feels facing a selection of make up, loving every product that you see. But you can't pick everything and wear it all!

If you have trouble about what you want to wear out, think of what particular product you'd like to rock.

For example, I've been into the red lips look lately. I've been into my NYX MegaShine Lip Gloss in perfect red.


And as you know, you can't wear heavy eye colour AND heavy lips. So instead, I rocked the gloss. The trick with red lips is neutral everything else, strong lip colour and a tonne of mascara.

And maybe a bit of blush and a hint of contour.

I know this sounds like a repeat of my previous post, but I'm just saying, less is more. Keep that in mind, girls!

Otherwise, you'll look like...


MIMI~! I love Mimi but too much eye and lip make up is OVERWHELMING!

I'll post another tutorial soon... if my reading eases up.

Thursday, July 1, 2010

Red lips tutorial - Newbies ahoy!

Hello, make up newbies! I'm sorry for the delays in posts, but I've been a bit busy lately.

Anyway, today I'll be showing you how you can achieve the red lip look without looking like a street walker.

I've seen many girls out there who wear too much of everything. Some have piled on dark eyeshadow with bronzed to death cheeks and electric red lips; this isn't a good look gals. Here's a motto you must always remember when applying your make up (and dressing up, even!)

"Less is more."

In order to look your best, you can only play up one feature of your face at a time. Eyes or lips; if you wear light eyeshadow, you might be able to get away with a bright lipstick. If you wear loud eyeshadow, loud lips can look a bit too much; otherwise you'll look like you were a casualty at the paint factory....

Right! Let's begin, shall we?


Step 1: Concealer! if you have dark under-eye circles like me, the concealer is your best friend. Take it with you if you need to, even! Here, I've applied the concealer under my eyes and around my nose and mouth.


Step 2: Mineral foundation. You can use liquid foundation if you want, but this is a beginner step for those with little experience. I myself find that Maybelline's Mineral Power Powder Foundations are easy to use. I use my Body Shop kabuki brush to blend it in.


Don't forget the neck area! I've seen girls with perfect foundations on their face, but the harsh edges (especially with liquid foundation) around the jawline gives it all away. Not a good look!

Step 3: Smile till your cheeks round up; this is where you apply your blusher. Slowly build it up, and fade it back to your hairline.

Step 4: In order to contour your face, squish your blush brush flat. If you have a flat brush, that would work too... :P

Make a duckface; GOD, I hate that face, but it's the best way to figure out where your contouring should be. The sunken bits of your cheeks are where the contour colours should go. I start from the hairline towards the center of the cheek. Use a bronzer for this.


Step 5: Mascara! Loads of mascara. Volumizing and lengthening mascara works best with the red lip look. If you have trouble with applying mascara (having it clump up or not evenly applying it, or that your lashes are too short for that particular brush) place a card between your skin and lashes, and apply your mascara from the base of the lashes, wiggling the wand from side to side.


Step 6: Lipstick time!


For best results, line your lips with a lip liner. I you have a lipliner that matches your lipstick closest, that would be best. but I only have neutral, so that'll have to do. Just make sure that the lipstick is blended in nicely with the lipliner.

The purpose of the lipliner is to prevent the lipstick from seeping into the fine lines around your mouth, which ruins the look.

For best results, you should use a make-up brush as it provides you with better control over the spreading of the product.


Voila! Remember gals, less is more!

Products used:
Maybelline's Mineral Power Concealer in Medium Beige 2-4
Maybelline's Mineral Power Powder Foundation in Pure Beige 2
Make up sponge - available in packs of 20 at pharmacies
Designer Brands blush in Berry
Thin Lizzy's 6-in-1 powder compact, Light (bronzer)
NYX Doll Eye Mascara - Lengthening
NYX Lipliner in Neutral
Designer Brands Matte Lipstick in Lady in Red
Ecotools Blush Brush
Body Shop Kabuki brush