The concealer I use is Maybelline's Mineral Power Natural Perfecting Concealer.


I took this photo from their website... :P
My skin tone would be in the medium range, I think, and I use the medium beige 2-4 concealer.
To demonstrate how much a difference concealers make when applied, I'll post a photo of myself before, during, and after application of the product.

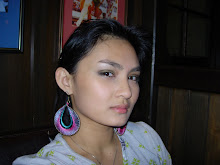
This is a photo of me before wearing any concealer. Notice how I have an uneven skin tone; I have dark patches around my mouth and under my eyes. And yes, I have a messy wall. I stack boxes on top of my book shelf. It's a small room, what do you want?!
 I apply my concealer in common problem areas; under my eyes and on the eyelid (which can help make eyeshadows last longer,) around my nose, and around my mouth. To blend the product in, I use an applicator sponge.
 Voila! See how big a difference that is?
 I apply my concealer in common problem areas; under my eyes and on the eyelid (which can help make eyeshadows last longer,) around my nose, and around my mouth. To blend the product in, I use an applicator sponge.
 Voila! See how big a difference that is?
You can apply concealers onto spots on your face, and also to hide zits! Just make sure that they don't clog your pores. Look for products that don't contain fragrance, talc or oil. If you want to smell nice, put on perfume; your face shouldn't reek of product fragrance.
Maybelline claims that their products don't clog pores and that they last all day. Personally, I find that to be very true. I break out easily, but as I avoid oily products, I've managed to keep the zits at bay.
So, newbies, this is where you should begin. Step 1 would be to find a concealer that suits you. Match is as closely as you can to your skin tone.
Alright, noobs, I hope this is helpful. I'll try to keep the posts coming.
Much love and good luck,
SharK the Make-Up Noob
source: http://www.maybelline.com/Product/Face/Concealer/Mineral-Power-Natural-Perfecting-Concealer.htm